Leonurus cardiaca
Life Cycle: Perennial
Family: Lamiaceae
Overview
Description
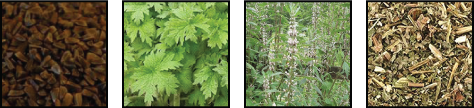
Medicinal use of motherwort dates as far back as the early Greeks, when it was used to relieve anxiety in mothers after childbirth. Hence the plant was named motherwort, or “mother’s herb.” In ancient China, motherwort was known to promote longevity. Native to Central Asia and southeastern Europe, motherwort is now found worldwide. The plant can grow up to 5 feet in height, and between late June and early September blooms small tubular flowers ranging from pale pink to purple in color. A bitter herb, motherwort has traditionally been used to strengthen the heart, regulate menstruation, treat insomnia, fevers, and stomach aches, and aid in childbirth. Other common names for the plant include cowthwort, lion’s ear, and lion’s tail.
Parts Used
Leaves and Flowers
All of the aboveground parts of the plant can be used. Motherwort leaves vary in size and shape. The lower leaves are deeply lobed in three to five parts with large teeth. They grow up to 5 inches long and are somewhat hairy. Moving upwards on the stem the leaves become smaller, the lobes and teeth less deep. Pale pink to purple, hairy, and in whorls of 6 to 12 alternating up the stem with leaves, motherwort flowers are hermaphrodite and pollinated by bees.
Medicinal Uses
Cardiac-protective, cardioactive, antiviral, anti-depressant, and uterine stimulant.
Actions
Motherwort helps decrease cholesterol and triglycerides, prevent blood clots and blood platelet aggregation.
Indications
- Motherwort is a relaxing tonic herb and mild sedative that gently relieves tension and anxiety when one is under pressure.
- It relieves symptoms such as a racing heart, palpitation of nervous origin and shallow breathing.
- Motherwort lowers blood pressure, calms and steadies heart rhythm. It balances electrolytes within heart cells. Improves blood flow to the coronary arteries; strengthens heart, and calms cardiac problems related to anxiety, tension.
- It regulates menstrual periods, lessens rheumatic pain, and overactive thyroid.
Dosage
- Infusion/Tea: 1-2 teaspoons of dried herb per cup of boiling water, up to two cups per day
- Tincture: 10-40 drops taken four times a day
Safety
- Women who are pregnant, breastfeeding, and those taking blood-thinning medication are advised to avoid motherwort.
- Consuming motherwort in excess may lead to diarrhea, uterine bleeding, or stomach pain.
Cultivation
Growing Conditions
- Hardiness Zones 3-9
- Full sun or partial shade
- Most soil types suitable as long as they are well-drained, though it grows best in rich, light soils with a pH of 7.7
- It’s to lay down compost in the area where the motherwort will be planted to add nutrients and help increase drainage
- After planting the motherwort outside, water every 2-3 days until mature. Mature plants are drought tolerant, but to grow the most potent plant, keep it well-watered
- Overall a very hardy plant once established
- To prevent motherwort from self-seeding all over your garden, cut the plant back to 3-5 inches after flowering, but before the seeds mature.
Propagation
Growing from Seed
- Can be directly sown outdoors in late fall or stratified before planting in spring. If planting in spring, sow indoors a few weeks before last frost for transplanting or directly plant in late spring after last frost
- Germinates in 2-3 weeks
- Soil temperature for germination should be 65-75°F
- Keep soil moist
Cold Stratification
- Soak seeds for 12-24 hours
- Place seeds in a plastic bag with equal parts sand and peat
- Seal the bag and put it in the refrigerator for 10 days, keeping the mixture moist
- After a month, plant the seeds in soil. If any of the seeds sprout while in the bag, plant the sprouted seeds immediately
You can also start new motherwort plants by rooting cuttings made from established plants at least 18 inches tall. This should be done in spring or fall when plants are dormant and temperatures aren’t too low.
Planting
Transplanting
- Plant seeds ⅛-inch deep in prepared soil. They won’t germinate and sprout if covered with too much soil.
- Wait until the seedlings are at least 4 inches tall and the last frost has passed before transplanting.
- Space young plants 1-3 feet apart.
- To transplant, take the plant out of the pot and spread its roots out gently, dig a hole twice the width of the root ball, place the seedling into the hole, cover with soil, and water deeply to set the plant in place properly
Direct Planting
- Plant seeds ⅛-inch deep in prepared soil
- Thin plants to 1-3 feet apart once they’ve sprouted
Companion Plants
No specific species, but in general, motherwort attracts many beneficial insects, so plant it near or in a vegetable garden.
Pests
Motherwort is very rarely affected by pests and diseases.
Harvest
Harvesting Tools
- Collection receptacle; wicker, cloth, or paper which breathes so that the herbs do not grow mold.
- Scissors
- Hand sanitizer
- A small stool or sitting mat may be helpful when harvesting for a long period of time.
Harvesting Procedure
The best time to harvest motherwort is when the plants are in full bloom or just after. That is when the active ingredients of the plant are highest.
- Sanitize hands and equipment
- Relax and direct generative thoughts toward the plants
- Snip to the base of the plant
- Leave flower stalks if you wish re-sowing to occur
- Place them in basket
- Repeat until you have desired amount of Motherwort
Drying & Production
Tincture
Dried Plants: 1 part dry weight (grams) to 5 part liquid volume (ml)
Fresh Plants: 1 part dry weight (grams) to 2 parts liquid volume (ml)
Items for Production
- Disposable Vinyl gloves
- Alcohol 80 proof or higher
- Batch jars: 1 gallon wide mouth glass jars with lids
- Scale
- Tincture press
- Food processor or blender
- Cheesecloth or Press filter bags
Procedure
- Put on a pair of disposable vinyl gloves.
- Crush or chop up plant material weighing it carefully.
- Record the weight and place the plant material in a blender or food processor.
- Weigh the materials and document the weight.
- Measure alcohol equal 5 times the dried herb weight.
- Measure alcohol equal 2 times the fresh herb weight
- Pour the liquid over the herbs and blend in a food processor to create a slurry.
- Pour the slurry into a wide mouth batch jar using a spoon to remove any air pockets.
- Fill a centimeter or more over the plant material to prevent any herbs from exposure to air.
- Place the lid on the jar and store in a cool dark place.
- Let the jar sit for 4-6 weeks or more.
- Shake jars up periodically during that time.
- After this point the tincture is stabilized and can be used as needed.
- When the tincture is ready for use, drain off the liquid into another batch container.
- Place the dregs into a cheesecloth pouch or tincture press filter bags.
- Use the tincture press to press the remaining liquid out of the dregs.
- Press hard enough to retrieve all of the liquid.
- For internal consumption the menstruum should be 100-140 proof alcohol which is 50-70% alcohol
- Measure and document the yield.
- The tincture may be stored in batches or decanted into dropper bottles for distribution.
Dried Motherwort Tea
Items for Production
- Disposable vinyl gloves
- Clean water
- Washing vats
- Colander
- Plant Dehydrator
- Vita mix commercial blender
- Storage bags
Procedure
- Put on a pair of disposable vinyl gloves.
- Weigh fresh motherwort to be used and document the weight.
- Place the plant material in a large container of clean room temperature water.
- Agitate gently to remove insects, soil foreign plant material etc.
- Repeat this procedure again.
- Rinse well.
- Place plant material in a colander over the sink to drain excess water
- Shake colander to promote drainage.
- Allow to sit until heavy dripping is subsided.
- Spread the plant material evenly across dehydrator trays so that there is even airflow.
- Stack trays into the dehydrator.
- Set dehydrator to 100°.
- Set the timer to 48 hours.
- At the end of the cycle check to see if flower material is fully dried.
- If not dried to your satisfaction set timer for another 48 hours.
- Dried plant material can now be placed in the vita mix food processor in small amounts.
- Use the pulse setting to mill the plant material down to the desired size for bulk tea
- If powder is desired the vita mix will be run for the amount of time it takes to break plant material into the appropriate powder.
- Upon completion place the dried plant material in tightly sealed storage bags or containers.
- Weigh the yield and document the weight.
- Carefully label the storage bags or containers with plant name, weight, source, and the date.
- Store in a dark dry place.