Calendula officinalis
Life Cycle: Annual
Family: Asteraceae
Overview
Description
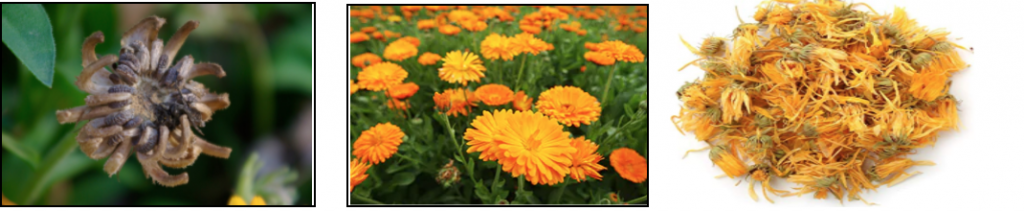
Calendula Flowers have been used for thousands of years for their beauty in ornamental settings and for their medicinal qualities.The plant grows to a height of two to three feet tall.
Parts used
Flowers – The bright orange and yellow big sunburst flowers with bright green leaves. The flowers can grow as large as three inches wide and are sticky and fragrant containing medicinal resins.
Medicinal Uses
Actions
Anti-inflammatory, anti-microbial, antispasmodic, emmenagogue, immunostimulant.
Indications
Internal use: strong lymphatic system toner; flushes toxins. Can be taken internally in tea or tincture form.
External, topical use: in salves, oils, creams, and serums.
Injury and wounds: antiseptic, immune modulating, and disinfectant while accelerating tissue healing. Prevents secondary infection. Use externally on wounds scrapes, cuts from bleeding, and inflammation. Stops bleeding from wounds, healing them rapidly by pulling the edges together and sealing them. It prevents scarring. Prevents and treats infected wounds, abscesses, ulceration and gangrene.
Burns: when applied as a wash externally to burns, Calendula gives immediate relief and prevents blisters. Use for chemical burns to the eye, scalds to the mouth.
Eye treatment: heals, soothes, reduces inflammation, swelling, and itching. Use in bacterial or viral conjunctivitis, irritation due to pollutants, allergies and minor corneal injuries. Apply as a local compress and eyewash or an eye drop formula.
Oral health: use as a wash to support treatment of bacterial and viral infections, to help with canker sores, gum disease or inflamed tissues. Excellent after dental or surgical work, mouth burns.
Mouthwash: combine calendula with spilanthes, myrrh, and peppermint.
Skin: Soothing as an external cream that calms itching and provides non-repressive relief for eczema, psoriasis, and rashes. Use for ringworm, diaper rash, cradle cap. Treats wounds, burns, bruises, moisturizes skin, and prevents scarring.
Cultivation
Growing Conditions
- Calendula grows well in well drained, rich in organic matter.
- It prefers full sun.
- It can grow at any elevation.
Propagation
- Eliminate weeds before planting.
- Weeding during the season is not necessary (only in the early stages).
- Germinates in 1 – 3 weeks
- Need spade hand tool
- Start from seeds (direct seed or in plugs).
- Plant seeds
- Plant seeds about ¼ inch deep
- Keep 12 inches between plants
- Plant rows 36 inches apart
- Cover lightly with potting mixture.
- Note planting date in harvest log.
- Note expected germination date for planning.
- Note transplant date if planted in a greenhouse.
- Note anticipated harvest date.
For transplant
- Dig a hole with spade large enough to transplant plug
- Remove plant from plug by squeezing the bottom of the plug or pinching plant out of plug. Be careful not to damage the roots.
- Place plant in hole (if there are a lot of roots be sure to loosen the roots so they can breathe
- Cover roots with soil up to stalk of plant
- Lightly water plant to avoid root shock.
Planting
- Avoid planting close together, this makes harvesting difficult
- Do not plant by echinacea
- Spreads by rhizomes and will fill open spaces
Pests
Disease: Aster yellows is a viral disease that causes deformities to flowers, carried by leafhoppers. (remove the affected plant)
Companion Plants: Tomatoes, asparagus, chard, radish, carrots, thyme, parsley
Harvest
Start harvesting Calendula flowers when first flush is in full bloom. Proceed to harvest every 3 days following (if possible). The best time in the day to harvest calendula is in the morning, so the dew has dried and the flowers have been opened up.
Harvesting Tools
- Collection bag: Use a wicker basket, cloth or paper bag that breathes so that the flowers do not collect moisture and grow mold,
- Scissors, hand sized clipper, or sharp Japanese garden shears made of stainless steel
- Hand Sanitizer: To avoid transferring potential contaminants to the plants,
- A small stool or sitting mat is optional. It may be more comfortable when harvesting for a long time period of time.
Harvesting Procedure
Sanitize hands, equipment, and supplies before starting.
- Relax and express gratitude to the plants. Extend positive regenerative energy to the plants.
- Harvest on a sunny day with extremely low humidity. Flowers should be picked when the sun has dried excess moisture from the petals.
- Pinch or clip the flower head off of the plant.
- Every time a flower is removed it will stimulate a new one to grow in its place, so harvesting can take place almost constantly (at least every three to four days).
Calendula Infused Oil
(Basic Formula for Dry Herb Infused Oils: 1:5 – Dry herb in g to volume in ml)
Items for Production
- Disposable vinyl gloves
- Flat drying tray or surface
- Crock pot or stock pot with a rack inside that prevents the glass jar from directly touching the surface of the pot.
- Stove or hot plate if using a stock pot (Optional: Use a simmer pad for low heat cooking if the stove is gas flame heat)
- Batch jars
- 1 gallon wide mouth glass
- Lids for batch jars
- Scale
- Carrier oil: (Sweet almond, avocado, grapeseed, or olive oil)
- Tincture Press
- Cheesecloth or press filter bags
Procedure
- Put on a pair of disposable vinyl gloves.
- Weigh the plant material and document weight.
- Spread the flowers out on a clean flat surface such as a tray and leave it in the sunlight for an hour. If there are worms living in the flowers, they will emerge in the sunshine. Remove any worms.
- Fill the batch jar up to the shoulder with Calendula flowers.
- Slowly pour oil the carrier oil over the flowers until they are completely covered.
- Pour an extra inch of oil so that no flower is exposed to air so as to avoid molding.
- Heat infusion:
- Heat enough water in the crock pot, or rack-equipped stock pot on a stove to reach the shoulder of the batch jar.
- Use the “warm” or “low” setting on a crock pot; turn the flame or burner down to low on a stove or hot plate.
- Leave the lid off of the batch jar.
- Leave the top off of the crock pot or stock pot.
- Heat slowly for 3-5 days.
- Replace water up to the batch jar shoulder as often as needed.
- Strain the oil through a fine-mesh strainer.
- Press the plant matter through cheesecloth or place in a press to squeeze the last bit of the oil out of the plant material.
- Measure and document the oil yielded.
- Compost the material that remains.
- Pour the infused oil into bottles for end-users or store in batch jars until ready to use.
- Clean up the facility afterwards and put all equipment back in its proper place.
Calendula Tincture
Items for Production
- Disposable vinyl gloves
- Flat drying tray or surface
- Batch jars
- 1 gallon wide mouth glass
- Lids for batch jars
- Scale
- Alcohol 80-100 Proof – 40-50 % alcohol
Procedure
- Put on a pair of disposable vinyl gloves
- Weigh the fresh flowers to be used and document weight
- Spread the flowers out on a clean flat surface such as a tray and leave it in the sunlight for an hour. If there are worms living in the flowers, they will emerge in the sunshine. Remove any worms.
- Fill the batch jar up to shoulder with flowers .
- And alcohol to completely cover flowers.
- Place the lid on the jar and store in a cool dark place.
- Leave it sit for 14 days or more.
- Shake jars up periodically during that time.
- The Calendula tincture is then stabilized and can be used as needed.
- Drain off the liquid into another batch container
- Place the dregs into a cheesecloth pouch or tincture press filter bag .
- Press the remaining tincture out of the dregs.
- Measure and document the yield.
- May be stored in batches or decanted into vials for distribution.
- Clean up the facility afterwards and put all equipment back in its proper place.
Dehydrated Calendula
Items for Production
- Disposable vinyl gloves
- Dehydrator
- Storage bags or glass canisters
Procedure
- Put on a pair of disposable vinyl gloves.
- Weigh flowers and document the weight.
- Do not wash the flowers.
- Spread the flowers out on a clean flat surface such as a tray and leave it in the sunlight for an hour. If there are worms
- living in the flowers, they will emerge in the sunshine. Remove any worms.
- Spread the flowers evenly across dehydrator trays.
- If end-use aesthetics are important, place flowers facedown on the dehydrator trays. This will preserve the shape of each individual flower in case they are to be used decoratively in the products that are made with them.
- Stack trays into the dehydrator.
- Set dehydrator to 95°.
- Set the timer to 48 hours.
- At the end of the cycle check to see if flowers are fully dried.
- If not dried to your satisfaction set timer for another 48 hours.
- Upon completion place to dried plant material in storage bags.
- Weigh the yield and document the weight.
- Carefully label the storage bags.
- Store in a dark dry place.
- Clean up the facility afterwards and put all equipment back in its proper place