Avena sativa
Life Cycle: Annual
Family: Poaceae
Overview
Description
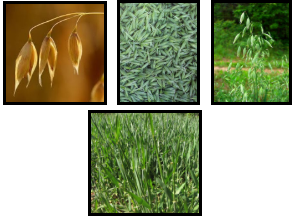
Oats are grown worldwide in temperate regions as a food crop. Oats possess an upright stem and fibrous root system. Milky oats are oat seed tops harvested when they are still milky, which happens after the plant flowers and before the oats harden. This herb coats the myelin sheaths in frayed nerves to restore deep energy over time. The oat plant originated in the Iberian peninsula, North-western Africa and Middle East region.
Part Used
Oat tops. The oat tops are picked while they are still milky. When the oat top is squeezed, it releases a white milky sap. In this stage the oat tops and the stems are still green. Oat tops contain bioactive ingredients such as Avenanthramides and amino acids.
Medicinal Uses
Actions
Nervine – Deeply nourishing, revitalizing, restorative, and rejuvenating for the brain and nervous system.
Indications
Nervous system nutritive and tonic for mental stress, nervousness, overwork, exhaustion, insomnia due to overfatigue, and weakness.
- Nutritive rather than temporary stimulatory effect on the brain.
- Treats mental exhaustion after illness, overwork or study, worry and anxiety.
- Excellent for weaning off of alcohol and drugs. Invigorating without overstimulation. Improves mental concentration, focus, and clarity.
- Restores proper nerve function, relieves nervous tremors, and eases a racing heart or palpitations.
Dosage
3-5 ml, 3 times daily.
Tincture
Take ½ to 1 teaspoon up to 3-times daily
Safety: Milky oat seed tops are non-toxic and considered very safe. Check with a healthcare professional if you are pregnant or are planning on giving it to a young child.
Cultivation
Growing Conditions
- Sow in well drained soil in full sun.
- Short-season, cool weather crop. Can be planted in fall/early spring.
- Optimum temperature is 68–70°F
- Good to plant in a previously weedy plot.
- Great for succession planting.
- Prevents erosion.
- Bio-accumulates calcium.
Propagation & Planting
Takes 45 – 60 days for seeds to fully mature.
Propagation
Milky Oats are generally planted directly.
Planting
Direct Planting
- Use a hoe to make the soil as level and fine as possible.
- Scatter seeds thickly across the surface of the soil using both hands or a seed spreader.
- Use rake or hands to spread seeds evenly.
- Walk across the area or pat with hands to ensure contact between seeds and soil.
- Once oats sprout, thin them to ensure they are 8 inches apart.
Planting Tips
Ensure that the initial layer of seeds is thick, as birds often eat them prior to germination.
Pest & Disease
- Milky oats are susceptible to fungi and viruses.
- Vulnerability to insects: aphids, armyworms, stinkbugs, wireworms.
Companion Plants
Burdock.
Harvest
Harvest when green grains are plump and spurt milky liquid when squeezed.
Harvesting Tools
- Collection bag
- Cloth or paper (something that breathes so that the herbs do not grow mold)
- Wicker Basket
- Breathable tool for collecting herbs
- A small stool or sitting mat is optional. It may be helpful when harvesting for a long period of time.
Harvesting Procedure
- Test by squeezing the green grain. If a milky substance comes out it is ready to be harvested.
- Strip the grain from the spikelets one stalk at a time by pulling them through your fingertips.
- Run your hand briskly up the top of the oat stalks while pressing firmly on the stalk with your thumb and forefinger so the oat seed heads fall into your hand.
- Have a bucket or bag ready to catch the oats as they fall.
Fresh Milky Oats Tincture
Items for Production
- Grinder or food processor
- Disposable vinyl gloves
- Alcohol 100-120 proof (50-60%)
- 1 gallon wide mouth mason jar with lid
- Metal strainer
- Wide mouth canning funnel and narrow funnel for pouring into final jars
- Chopstick to stir
- Scale
- Tincture press
- Cheese cloth or press filter bags
Tincture Procedure
- Put on a pair of disposable vinyl gloves.
- Weigh the harvested milky oats to be used and document the weight.
- Lightly grind the milky oats to increase surface area which releases more medicinal properties into the alcohol.
- Measure alcohol needed to equal twice the weight of fresh plant material.
- Pour the alcohol over the oats in a 1 gallon wide mouth jar to cover the plant matter.
- Stir with a chopstick to remove any air bubbles and ensure that there is no plant material exposed to the air.
- Cover the jar tightly.
- Label the jar with:
- Plant name
- Alcohol content
- Date
- Source of herb or harvest location.
- Place the jar in a dark place for 4 weeks or more. The tincture may be left to mature for several months.
- Shake up the tincture batch jar periodically (shaking daily is preferable).
- After the curing period, pour off the alcohol through a strainer into a separate glass container.
- Place the plant matter that remains in a filter bag or a cheese cloth and wring out the remaining liquid.
- You may also place this bag in the herb press.
- Tighten the press until all of the remaining tincture is pressed out of the dregs.
- Release the pressure and take out the compressed plant material cake. Add it to your compost.
Dried Milky Oats Tea
Items for Production
- Disposable vinyl gloves
- Plant Dehydrator
- Vita mix commercial blender
- Storage bags
Procedure
- Put on a pair of disposable vinyl gloves.
- Weigh fresh Milky Oats to be used and document the weight.
- Agitate gently and remove insects, soil foreign plant material etc.
- Spread the plant material evenly across dehydrator trays so that there is even airflow.
- Stack trays into the dehydrator.
- Set the dehydrator to 100°.
- Set the timer to 48 hours.
- At the end of the cycle check to see if flower material is fully dried.
- If not dried to your satisfaction set timer for another 48 hours.
- Dried plant material can now be placed in the vita mix food processor in small amounts.
- Use the pulse setting to mill the plant material down to the desired size for bulk tea
- If powder is desired the vita mix will be run for the amount of time it takes to break plant material into the appropriate powder.
- Upon completion, place the dried plant material in tightly sealed storage bags or containers.
- Weigh the yield and document the weight.
- Carefully label the storage bags or containers with plant name, weight, source, and the date.
- Store in a dark dry place.