Scutellaria
Life Cycle: Annual or Perennial
Family: Lamiaceae
Overview
Description
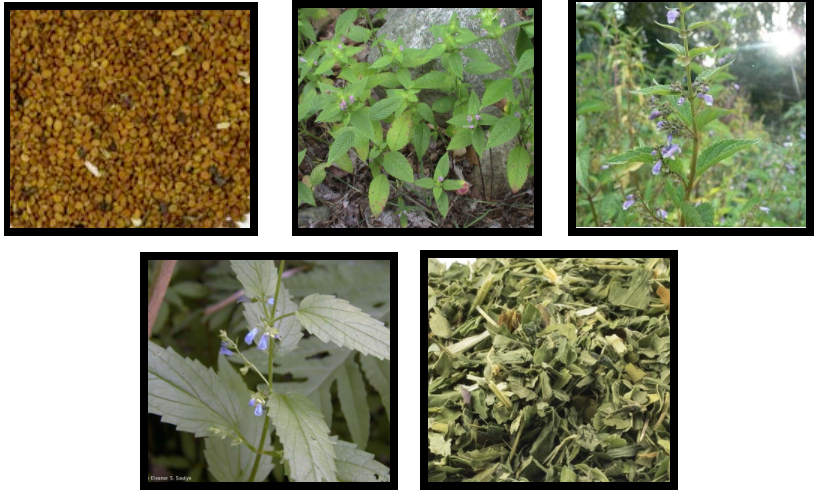
Skullcap is a part of the mint family. American skullcap is native to North America, and is now widely cultivated in Europe and other areas of the world. For more than 200 years it has been used as a mild relaxant and as a therapy for anxiety, nervous tension, and convulsions. Harvest the plants while they are flowering—the peak of their herbal power—then use the leaves and stems as herbal medicine.
Parts Used – Leaf
The skullcap leaf has square stems and jagged leaf edges. The leaf itself contains flavonoids,
Medicinal Uses
Nervine, sedative, and antispasmodic.
Actions
Skullcap contains phenolic compounds, especially flavonoids, which provide seizure relief. Baicalin and baicalein, wogonin, and apigenin all help to reduce anxiety.
Indications
Used for insomnia, anxiety, stroke, fever, high cholesterol, and inflammation.
- Oroxylin A (an antioxidant found in the roots of skullcap) help protect against memory impairment induced by amyloid beta
- Compounds found in skullcap slow the growth of prostate cancer tumors
Dosage
- Infusion/Tea: 240 ml 3 times/day
- Tincture: 2 to 4 mL 3 times/day
Safety
People with these conditions should consult a doctor before using skullcap:
- Limited liver function.
- Individuals on blood thinners, cholesterol-lowering medications, cytochrome P450 substrate drugs, and pain killers
- Children and pregnant or breastfeeding women.
Cultivation
Growing Conditions
- Skullcap grows easily in a partly shady location.
- Can grow in most garden soil.
- Sow seed in early spring after danger of frost is past.
- Blooms from July to October.
- Best to start indoors.
Propagation
- Start indoor propagation in late winter.
- Stratify seeds for at least 1 week before planting.
- Seeds will germinate in 10-20 days after stratification.
From Seed
- Stratify the seed.
- Put the skullcap seeds in a plastic ziplock bag with moistened vermiculite or sand.
- Put the bag in the refrigerator and leave it there for a week.
- Place stratified seeds ¼ of an inch deep into a planting tray with prepared soil
- Do not cover seeds.
- Place the tray in a warm place with natural light.
- Wait about two weeks for seeds to germinate.
- After first true leaves have developed, the plant is ready to be transplanted outside
Planting
Transplant six to eight weeks after starting in a greenhouse.
For Transplant
- Find a spot with partial shade for permanent planting.
- Dig a hole larger than the roots to place seedling in.
- Take plant out of pot without disrupting root system.
- Transplant seedlings at a spacing of 45cm (18″) into the garden.
- After seedling is transplanted, cover roots with soil
Companion Plants: Any summer-blooming anemone, such as hardy begonias, red lobelia, or cardinal flower.
Pests
Disease
Powdery mildew and leaf spot may occur
Insects
Watch for aphids.
Harvest
Harvesting Tools
- Collection receptacle that aerates the herbs so they do not grow mold: Cloth, paper or a natural material basket.
- Scissors
- Hand sanitizer
- A small stool or sitting mat
Harvesting Procedure:
Pick when beginning to flower
- Sanitize hands and equipment
- Relax and direct generative thoughts toward the plants
- Harvest the aerial parts 3 inches above the ground for use with scissors
- Check to remove any brown leaves or flowers from the stalk
- Place them in the harvesting receptacle.
- Repeat until you have desired amount of Skullcap
Drying & Production
Tincture
Items for Production
- Disposable Vinyl gloves
- Alcohol 100 proof
- Batch jars: 1 gallon wide mouth glass jars with lids
- Scale
- Tincture press
- Cheesecloth or Press filter bags
Procedure
- Put on a pair of disposable vinyl gloves.
- Weigh the materials and document the weight.
- Fill the jar up to its shoulder with skullcap
- Fill with alcohol to completely cover plant material.
- Place the lid on the jar and store in a cool dark place.
- Let the jar sit for 6 weeks or more.
- Shake jars up periodically during that time.
- After this point the tincture is stabilized and can be used as needed.
- Drain off the liquid into another batch container.
- Place the dregs into a cheesecloth pouch or tincture press filter bags.
- Use the tincture press to press the remaining liquid out of the dregs.
- Press hard enough to retrieve all of the liquid.
- For internal consumption the menstruum should be 100-140 proof alcohol which is 50-70% alcohol
- Measure and document the yield.
- The tincture may be stored in batches or decanted into dropper bottles for distribution.
Dried Skullcap Tea
Items for Production
- Disposable vinyl gloves
- Clean water
- Washing vats
- Colander
- Plant Dehydrator
- Vita mix commercial blender
- Storage bags
Procedure
- Put on a pair of disposable vinyl gloves.
- Weigh fresh skullcap to be used and document the weight.
- Place the plant material in a large container of clean room temperature water.
- Agitate gently to remove insects, soil foreign plant material etc.
- Repeat this procedure again and rinse well.
- Place plant material in a colander over the sink to drain water.
- Allow to sit until heavy dripping is subsided.
- Spread the plant material evenly across dehydrator trays so that there is even airflow.
- Stack trays into the dehydrator.
- Set the dehydrator to 100° and the timer to 48 hours.
- At the end of the cycle ensure that the plant material is fully dry.
- If it is not fully dried, set the timer for another 48 hours.
- Dried plant material can now be placed in the vita mix food processor in small amounts.
- Use the pulse setting to mill the plant material down to the desired size for bulk tea
- If powder is desired the vita mix will be run for the amount of time it takes to break plant material into the appropriate powder.
- Place dried plant material in tightly sealed storage containers.
- Weigh the yield and document the weight.
- Label the storage containers with the plant name, weight, source, date, and store in a dark dry place.