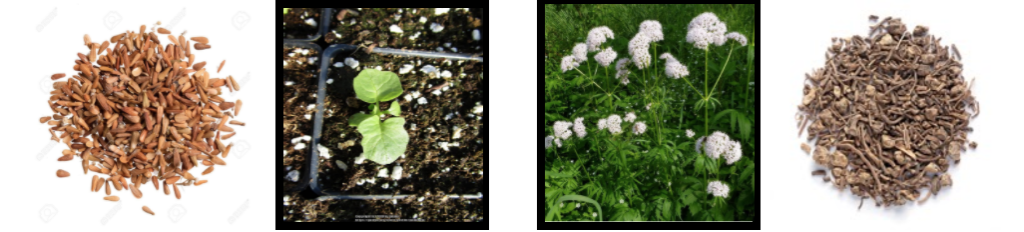
Valeriana officinalis
Life Cycle: Perennial
Family: Honeysuckle
Description
Valerian is native to Europe and Asia. It is a medicinal herb dating back to ancient Rome and Greece. In the summer, the mature plant has a height of 1.5 metres, and bears sweetly scented pink or white flowers. Valerian has been used to assist with sleep disorders. In many areas of the United States, this medicinal herb is considered a weed.
Part Used
Roots
Valerian root has a strong, earthy odor due to the volatile oils and other compounds responsible for its sedative effects.Valerian root contains valerenic acid, isovaleric acid and the antioxidants hesperidin and linarin.
Medicinal Uses
Actions
Nervine. Sedative antispasmodic.
Indications
- Calming, anti-anxiety, reduces restlessness, nervousness, improves restful sleep, relieves psychological stress, trembling, and headaches.
- Relieves muscle spasms due to stress and tension, eases menstrual pain, intestinal and irritable bowel spasm.
- Relieves gas and bloating.
- Valerian causes no morning hangover, impaired mental physical performance or other side effects associated with most sedatives.
- Lowers blood pressure and increases the amount of gamma aminobutyric acid (GABA) in the brain. GABA helps regulate nerve cells and calms anxiety.
- Improves learning skills, diminishing aggressive behavior.
Dosage
Tincture: ½ tsp, 30 minutes to two hours before bedtime or as needed. Ma be taken during the day for anxiety in similar doses.
Safety
Safe for occasional use. Don’t take valerian root for more than a month without talking to your doctor. May amplify the effects of barbiturates and alcohol. Not advised for children under two.
Cultivation
Growing Conditions
- Well drained soil
- Full sun to partial afternoon shade
- Extremely cold hardy, even in harsh winter climates
- Between 5.5 and 7.0 in pH
Propagation & Planting
Propagation
- Start seeds indoors and set out seedlings two to four weeks before your last frost
- Fill plug tray with potting soil mixture
- Place 1 seed in each plug
- Push seed ¼ of an inch deep
- Cover seeds
- Sprinkle evenly with water
- Place plug tray in a place that gets at least 6 hours of sun per day
- Check progress daily and note in log
- When seedlings have grown 2 – 3 true sets of leaves, carefully transplant them outdoors, taking care not to disturb root system
Transplantation
- Space each plant approximately 3 feet apart
- Dig a hole large enough to transplant plug
- Remove the plant from the plug by squeezing the bottom of the plug or pinching the plant out of the plug. Be careful not to damage roots.
- Plant rows 2 feet apart
Planting
Direct seed in spring or fall
- Use a hoe to make the soil as level as possible
- Sow 1 seed per inch at a depth of 3/8- 1/2″
- Thin to 12-18″ apart, in rows 3′ apart.
Planting tips
Valerian produces extremely fragrant flowers in early summer. Gather them for use as cut flowers to keep valerian from reseeding and becoming invasive.
Pests
Vulnerable to insects – Aphids, slugs and snails
Companion plants
Echinacea, Catnip, Agastache and Dill. Often planted with low, mound-forming herbs and flowers
Harvest
Harvesting Tools
- Collection bag (Cloth or paper that breathes so that the plant material does not grow mold.)
- Wicker basket
- Narrow spade
- Garden trowel
- Loppers
- A small stool or sitting mat is optional.
Harvesting Procedure
Background
- Dig roots in fall or early spring, when ground is not frozen
- Sheer flowers while in bloom to prevent spreading
- Wait one year before harvesting roots
- Cut blooms before harvest to increase potency of root
- Go a few days without watering before harvest to collect root at maximum potency
Steps
- Separate large valerian plant with spade
- Dig deeply to recover entire root system
- Shake root off to remove loose dirt clumps
- Place root in collection container
Drying & Production
Valerian Tincture
Items for Production
- Disposable Vinyl gloves
- Alcohol 100 – 140 proof alcohol which is 50-70% proof
- 1 gallon wide mouth glass batch jars with lids
- Scale
- Scrub brush
- Tincture press
- Cheesecloth or Press filter bags
Procedure
- Put on a pair of disposable vinyl gloves.
- Weigh the materials and document the weight.
- Place roots in large container of clean room temperature water.
- Scrub and rinse repeatedly to remove insects, soil foreign plant material etc.
- Place the roots in a colander over the sink to drain excess water.
- Shake colander to promote drainage and/or pat dry with sterile towels.
- Chop root into small pieces.
- Fill the jar up to its shoulder with finely chopped Valerian
- Fill with alcohol to completely cover plant material.
- Place the lid on the jar and store it in a cool dark place.
- Let the jar sit for 6 weeks or more.
- Shake jar periodically during that time.
- After this point the tincture is stabilized and can be used as needed.
- Drain off the liquid into another batch container.
- Place the dregs into a cheesecloth pouch or tincture press filter bags.
- Use tincture press to press the remaining liquid out of the dregs.
- Press hard enough to retrieve all of the liquid.
- For internal consumption the menstruum should be 100-140 proof alcohol which is 50-70% alcohol
- Measure and document the yield.
- The tincture may be stored in batches or decanted into dropper bottles for distribution.
Dried Valerian Tea
Items for Production
- Disposable vinyl gloves
- Clean water
- Washing vats
- Colander
- Plant Dehydrator
- Vita mix commercial blender
- Storage bags
Procedure
- Put on a pair of disposable vinyl gloves.
- Weigh fresh Valerian to be used and document the weight.
- Place the plant material in a large container of clean room temperature water.
- Scrub and rinse repeatedly until insects, soil foreign plant material etc. have been removed.
- Place plant material in colander over the sink, drain excess water
- Shake colander to promote drainage.
- Finely chop root into small pieces.
- Spread the chopped root evenly across dehydrator trays so that there is even airflow.
- Stack trays into the dehydrator.
- Set the dehydrator to 100°.
- Set the timer to 48 hours.
- At the end of the cycle check to see if the roots are fully dried.
- If not dried to your satisfaction set timer for another 48 hours.
- Dried roots can now be placed in the vita mix food processor in small amounts.
- Use the pulse setting to mill the plant material down to the desired size for bulk tea
- If powder is desired the vita mix will be run for the amount of time it takes to break plant material into the appropriate powder.
- Upon completion, place the dried plant material in tightly sealed storage bags or containers.
- Weigh the yield and document the weight.
- Carefully label the storage bags or containers with plant name, weight, source, and the date.
- Store in a dark dry place.