Symphytum officinale (Russian)
Knitbone, Knitback
Life Cycle: Perennial in tropical environments, Annual in temperate zones
Family: Solanaceae
Overview
Description
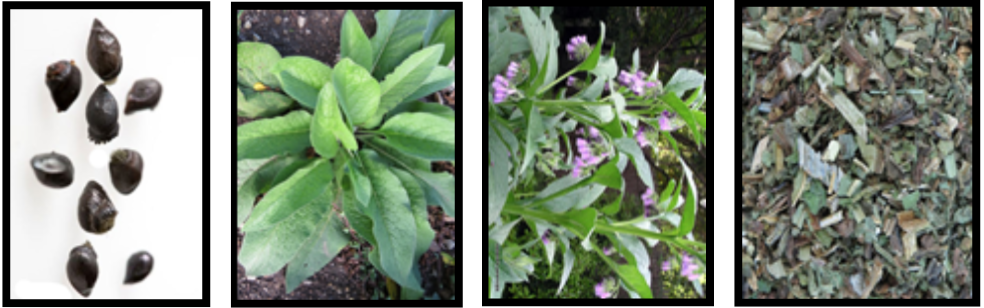
Comfrey plants are well known throughout the temperate zones. Stalks grow two or three feet high and are hollow and hairy. Flowers bloom throughout the summer. They stand in order one above the other and are hollow like the fingers of a glove. They are pale purplish or pale white. It has a long-established history as a healing accelerator. It addresses skin problems like warts, cuts, discolorations, bee stings, bug bites, and keloids. One of its common names is knit bone because many healers of the past used it to speed up bone repair after a break.
Parts used
Roots
Roots are fibrous, fleshy, an inch or less in diameter, and up to a foot long. They have a smooth blackish exterior and interior is white, fleshy and juicy. Used in tonics.
Leaves
Comfrey has large hairy, bristly green leaves with pronounced veins which can make skin itch when touched. Simple alternate leaves have a single leaf per node and can grow up to 10 inches long. The leaves have a high water content.
Used as an astringent or anti-inflammatory agent.
Medicinal Uses
Actions
Nutritive tonic, demulcent, expectorant, emollient, vulnerary, astringent, hemostatic.
Indications
Cough, lung infections, gastrointestinal ulcers, diarrhea, broken bones, sprains, fractures, wounds, sores and boils. Comfrey is rejuvenatory to lungs and mucus membranes. It provides deep support to tissues and cells of most types. It is an agent for promoting tissue growth externally, internally and healing throughout the body when it has been afflicted by disease or traumatic injuries.
Expectorant action
Promotes expulsion of mucus. Two teaspoons of powder can be boiled in water or milk and combined with spices such as ginger, cloves, and cardamom.
External healing
Poultices, oils, salves, and ointments.
Both comfrey roots and leaves are used as an application for wounds, fractures, broken bones and ruptures. It cuts bone healing time by half.
Allantoin is the constituent in comfrey that promotes wound he
aling and is the key ingredient in skin preparations for conditions such as psoriasis. Comfrey soothes irritation, stops bleeding, and prevents scar formation in skin injuries.
Safety
Internal use cautions:
- Do not use for more than 3-5 days without a break of at least a month.
- Do not take during pregnancy.
External use cautions:
- Do not use where there is redness, puffiness or oozing,
- Use carefully with deep wounds because of the danger of closing the laceration quickly before the deeper tissue has had an opportunity to drain which could trap infection, pus and dead tissue.
Cultivation
Growing Conditions
- Comfrey grows by ditches, watersides, in moist fields.
- Can thrive in varied conditions but does best under the shade of trees.
- Self-propagates easily and vigorously spreading quickly.
- It can be propagated via root divisions.
- Prefers clay, light sand and loam.
- Will grow in wet or dry areas.
- The best time to plant is late spring – early summer.
Propagation
- Vegetative root division is the preferred method of propagation
- Use toilet paper rolls for early growth or place root segments directly in fertile soil
- Seeds will germinate in 5 – 15 days.
Planting
- Indirect Planting: Grow from plugs
- Take live comfrey root and cut to about 3 – 4 inches.
- Line up 12 – 36 rows of toilet paper rolls filled about an inch from the top with soil. Can also be propagated in pots or root trainers.
- Create a small divot in the soil with finger.
- Place root cutting in each whole.
- Cover with 1 inch to 1.5 inches of soil.
- Direct planting
- Place the shovel in the ground and create a hole with forward pressure.
- Place a 3 – 4 inch comfrey root fragment into the hole horizontally.
- Step on hole to cover Comfrey root.
- Space roots 8 – 12 inches apart.
- Plant rows 24 inches apart.
Pests
No major pests
Companion plants: Fruit trees
Harvest
In the first growing season, only lightly harvest the outer Comfrey leaves. This will most likely occur in September. Older plants can be harvested through wilt-down when the temperature goes below 15° F. The roots are best harvested in early winter.
Harvesting Tools
- Spade
- Wheelbarrow
- Collection box or container
- Hatchet or machete
Harvesting Procedure
Comfrey plants offer multiple leaf harvests in one growing season and abundant root harvests in the early spring and fall.
Leaves: To harvest leaves throughout the summer cut the whole plant down to three or four inches above the crown and let it regenerate.
Roots: Harvest in the spring or fall when there is no arial growth. Roots grow up to two feet in length and can be dug by hand with a spade or modified potato digger. Prior to digging the roots it is helpful to mow down the aerial tops.
- Using a spade, dig carefully around the root loosening the soil.
- Grip the stalk with both hands and pull slowly until the root is unearthed.
- Using a hatchet or machete Separate the root from the stalk.Separate leaves from the stalk prior to drying.
- Put roots in a collection container.
- Weigh the root material and document.
Helpful Tip: Process as soon as possible after harvesting (preferably within 2 hours).
Drying & Production
Items for Production: Equipment
- Cement mixer (small)
- Crock pot or stock pot with a rack inside that prevents the glass jar from directly touching the surface of the pot.
- Dehydrator
- Electric mixer or blender
- Hose with high velocity spray nozzle
- Stove or hot plate if using a stock pot (Optional: Use a simmer pad for low heat cooking if the stove is gas flame heat)
- Tincture Press
Items for Production: Supplies
- Beeswax pellets
- Carrier oil of choice: olive oil, avocado oil, sweet almond oil, or pomace oil
- Cheesecloth or press filter bags
- Colander(s)
- Distilled water
- Double boiler
- Glass batch jars
- Glass batch jar lids
- Product jars (for end users)
- Saucepan
- Scrub brush(s)
- Strainer (fine mesh)
- Storage bags or containers
- 1 Vitamin E 1000 I.U. perle (10drops)
- Vinyl gloves
- Washing tubs (food grade)
Leaves
Procedure: Cleaning and Dehydration
- Pull leaves off the stems prior to dehydration in order to speed up the drying process. Comfrey leaves have a high water content and can easily bruise and turn brown. Browning is often caused by rough handling and by drying too rapidly at too high a temperature.
- Rinse in food grade washing tubs in distilled or filtered water to move insects and all particulate matter.
- Drip dry in colanders until most, if not all extraneous moisture has evaporated.
- Lay leaves out on dehydration trays in a single layer with minimal overlap. Good airflow is important.
- Begin drying at lower temperatures, 90-95 F. Then gradually raise the heat after the leaves begin to lose their moisture. Finish drying at temperatures of no more than 100F.
- Remove from the dehydrator.
- Crumble to desired grade.
- Store in airtight plastic bags or containers. Label with product name, date, and weight.
Roots
Procedure: Cleaning and Dehydration
- Transport roots to processing area.
- Carefully wash the soil from the roots. Soil often gets compacted in the central crown of comfrey where the roots begin to branch off.
- It is helpful to quarter/split the roots before washing. Comfrey roots are relatively soft and can be chopped easily with a field knife.
- Use a small cement mixer to tumble-wash large quantities of roots.
- After rinsing roots through the mixer, spray them with a hose to make sure that all soil is removed.
- Scrub vigorously with a hard bristle scrub brush if necessary.
- Place the pieces in a dehydrator at 105-110 degrees for 4-6 days until fully dried.
- Remove from the dehydrator and mill.
- Mill roots after fully dried. Comfrey root is so full of mucilage that it will get gummy if chipped when fresh.
Infused Comfrey Oil
Procedure
(Basic Formula for Dry Herb Infused Oils: 1:5 – Dry herb in g to volume in ml)
- Transfer dehydrated milled root into a gallon jar to within one inch of the top.
- Fill the batch jar up to the shoulder with milled root.
- Slowly pour oil the carrier oil over the root material until it is completely covered.
- Pour an extra inch of oil so that root material is exposed to air so as to avoid molding.
- Heat infusion:
- Heat enough water in the crock pot, or rack-equipped stock pot on a stove to reach the shoulder of the batch jar.
- Use the “warm” or “low” setting on a crock pot. Turn the flame or burner down to low on a stove or hot plate.
- Leave the lid off of the batch jar.
- Leave the top off of the crock pot or stock pot.
- Heat slowly for 3-5 days.
- Replace water up to the batch jar shoulder as often as needed.
- Strain the oil through a fine-mesh strainer.
- Press the root material through cheesecloth or place in a press to squeeze the last bit of the oil out of the root material.
- Measure and document the oil yielded.
- Compost the material that remains.
- Pour the infused oil into bottles for end-users or store in batch jars until ready to use.
- Label bottles with plant name, oil proportions and date.
- Clean up the facility afterwards and put all equipment back in its proper place.
Comfrey Skin Creams
Procedure
(Basic Formula for Skin Creams: 1:3:1 – Wax in g: Herbal oil in ml: Distilled water in ml)
- Bring 50 ml distilled water to a boil in a saucepan.
- Add appropriate flower, herb or root of choice to the water. Jewelweed, calendula, yellow dock would be good choices to compliment comfrey.
- Steep and let cool.
- Strain all of the plant matter out of the water.
- Melt approximately 50g beeswax pellets in a double boiler. For a thin cream use less wax. For a robust cream use more wax. (Note: melting temperature for beeswax is 150°F). Be careful not to boil.
- When beeswax has melted and totally dissolved, stir the mixture thoroughly for 2 to 3 minutes until completely homogenized.
- Add the infused comfrey oil previously prepared.
- Stir in the Vitamin E oil. Squeeze it out of the peel.
Heat the herb water until it is approximately the same heat as the wax-oil mix. Both should be about 158 F.
- Remove the oil and beeswax from the double boiler and away from the heat.
- Beating by hand or using an electric mixer, beat the oil-wax mixture as the
- Herb water is slowly dribbled, one tablespoon at a time into it.
- Add the herb water very slowly until emulsification is complete. This should take about 10 minutes. A blender can also be used for this process. (Emulsification is a process whereby a water substance is dispersed and suspended in an oily substance.)
- Essential oils of choice may be added at this point.
- The clear oil-wax mixture will turn white and harden into cream.
- Scoop the cream into sterile end user product containers (wide-mouth jars) and label with product name, ingredients and batch date.
- Pack containers into a storage box and safely store.
- Store containers in a dark cold place or in a refrigerator to prolong shelf-life.
- Comfrey cream prepared in this way will require no additional preservatives and have an expected shelf life of six months to a year.